Synology Merging Two Volumes. For the longest time since I bought the Synology DS1813+, I have been running two volumes in the same Synology box. This has become two storage pools (a concept that was introduced years after I bought). Honestly I could not remember why I had two volumes. Most likely I have read somewhere that it is good for safety (one volume’s crash will not bring down the other volume).
Table of Contents
Recently, I decided to merge the two volumes into one.
Synology Merging Two Volumes : Why merge two volumes
Volume 1 of my Synology has 5 disks. 4 pieces of 6TB and 1 piece of 4TB.
This gives me 22TB of hard disk space according to Synology RAID calculator.

Volume 2 consisted of 3 pieces of 6TB hard disks. This gives me 12TB of space.

The total amount of space is hence, 22 + 12 = 34 TB of space 🙂
However, if you just have one volume (by merging Volume 1 and Volume 2 of the Synology), I get 40 TB of space. Another 6 TB more than two separate volumes.

Most importantly, it allows me to expand easier with one volume than two volumes. It is more expensive to expand two volumes in terms of buying the correct number of hard disks than just replacing a hard disk in a single volume.
The bad thing ? You have only 1 volume. You can only suffer one bad hard disk crash in that one volume (if you are using the Synology SHR).
Moving Data out of Volume 2
You need to first move the data out of the volume 2. Unfortunately, you cannot just “merge” the two volumes together (in two separate storage pools) by just clicking a button.
There are several ways of doing so. They are detailed here. I ended up using two methods only and backed up the rest to external hard disks.
Firstly, the FIRST METHOD for me is specifically for smaller (in size) shared folders in volume 2, I simply changed the location to volume 1.


The Second Method is to use the File Station to move sub-folders. This is more in the case where either (1) the shared folder is bigger than volume 1’s available capacity (2) you want to control which sub folders to move.
You do need to use the SHARED FOLDER tool in the CONTROL PANEL to create a new shared folder first in volume 1. Then you can go to file station and manually choose the files to move.

Finally, as Volume 1 is coming to its capacity, but my Volume 2 still have about 2TB of data, I am forced to copy the 2TB of data from Volume 2 to an external hard disk.
Removing the old volume
Now that I have either moved the data in Volume 2 to Volume 1 and also backed up the rest of the data, I am ready to destroy or remove the old Volume 2.
To do that, go to STORAGE POOL and click on REMOVE


You need to supply the administrative password.

And there it goes…

This took a couple of minutes and all that is left is the Volume 1 now.

Adding Existing Disks to the remaining Volume
So now I have a volume 1 left (with its 5 disks) and 3 disks (from the old volume). This is just the typical expanding a volume with new disks as written in this article.
You go to the storage pool and choose Storage Pool 1 and then ADD DISK.

The existing 3 disks from the original Volume 2 is next shown. You can choose all 3 to be added to the Volume 1.


And the consistency check begin.

This will take a while.
After 1.5 hours, only 2%..

I cannot imagine how long this whole process is going to take. There are 18TB involved here…. Look at this article back in 8 years ago when it took 55 hours to just expand 3TB.
In the meantime, you can enjoy the picture of all the drives in the storage pool.
8 disks. Can you spot the odd one out 🙂

Completion of Migration
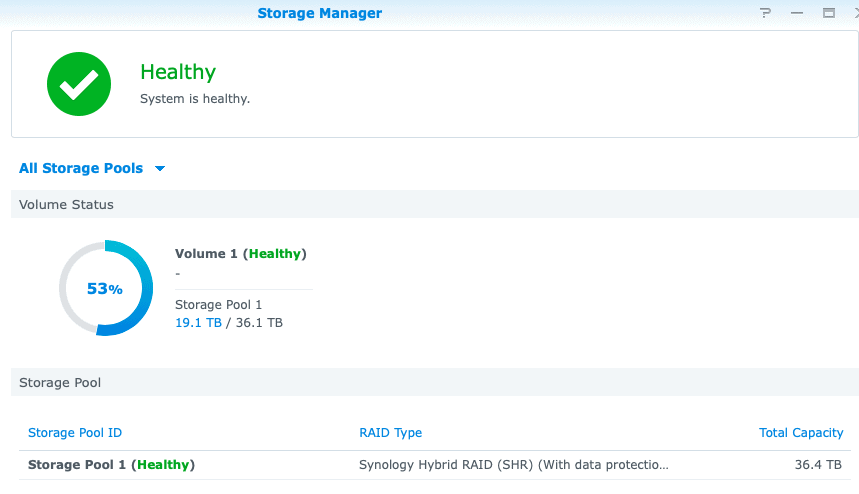
Okay. It is now finished 🙂
The whole Volume 1 is now one single volume with about 53% space left.

How long did it took ?
Let’s check the log.

It is surprisingly good. Just took 2 days only.
From: Thursday, 24 December 2020, 19:20:05
To: Saturday, 26 December 2020, 23:48:10
Result of Time for Synology Merging Two Volumes
2 days, 4 hours, 28 minutes and 5 seconds
The duration is 2 days, 4 hours, 28 minutes and 5 seconds
Or 2 days, 4 hours, 28 minutes, 5 seconds
Nice !


